Emergency Signaling Tips for Lost Campers: How to Be Found Faster

Latest Post


Getting lost in the wilderness is frightening, but panic is not your biggest enemy — invisibility is. Emergency Signaling Techniques for Lost Campers exist for one simple reason: rescuers cannot help if they cannot see or hear you.
Understanding the importance of Emergency signaling
Getting turned around on a trail happens more often than you’d think. Maybe the path looked different than your map suggested, or fog rolled in faster than expected. Whatever the reason, finding yourself lost in the wilderness is genuinely scary.
But here’s what experienced search and rescue teams will tell you: panic isn’t usually what puts campers at the greatest risk. The real danger? Not being seen or heard by the people actively looking for you.
That’s where emergency signaling comes in, and it could absolutely save your life.
Why emergency Signaling can save your life in the wilderness?
The reality of getting lost while camping
Thousands of campers get disoriented in the wilderness annually, but most are found within 24-48 hours. The difference? Knowing how to signal for help when lost.
Search and rescue teams scan vast areas—even with helicopters and thermal imaging, a silent person can blend into the terrain from a surprisingly close range. That’s where wilderness survival signaling becomes your lifeline. A strong emergency signal cuts through the clutter, and these wilderness distress signals often determine whether you’re spotted immediately or overlooked.
How search and rescue teams actually find lost campers?
Modern search and rescue operations use drones, infrared cameras, and GPS tracking. But all that equipment still requires effective emergency signals to detect.
Visual distress signals work during daylight flights. Emergency whistle signals and other audible methods help ground teams pinpoint your location. Signal mirror techniques can catch a pilot’s eye from miles away with reflective flashes.
Lost campers who get found fastest understand what rescuers are looking for and consistently use proven camping emergency signals.
The Golden Rule – Stay Put and Signal
Why wandering makes rescue harder?
Here’s a mistake that’s easy to make when you’re lost: you keep moving, hoping you’ll stumble onto something familiar.
In reality, wandering usually makes everything worse. You exhaust yourself physically, you cover more ground (making the search area larger), and you eliminate the one advantage rescuers have—a fixed last-known location to work from.
Unless you’re 100% certain about your direction, staying put and using emergency signaling techniques gives search teams a stationary target. It’s counterintuitive, but it works.
The psychological benefits of active signaling
Beyond the practical advantages, having an emergency signaling routine does something crucial for your mental state. It keeps your brain engaged in productive wilderness survival activity rather than spiraling into panic.
Survivors consistently report that actively using camping emergency signals—building signal fires, using emergency whistle signals, arranging ground-to-air symbols—helped them stay calm and hopeful during long waits. When you’re lost while camping, you’re doing something purposeful. You’re taking action with proven survival signaling techniques. That matters more than you might realize when you’re alone and scared.
Universal distress signals every camper should know
Before we dive into specific techniques, let’s talk about the signals that work everywhere, recognized by rescue professionals worldwide.
The Rule of Three (International Emergency Signal)
This is the single most important wilderness distress signal to remember: three of anything signals distress.
- Three emergency whistle signals
- Three flashes of light (using signal mirror techniques or flashlight)
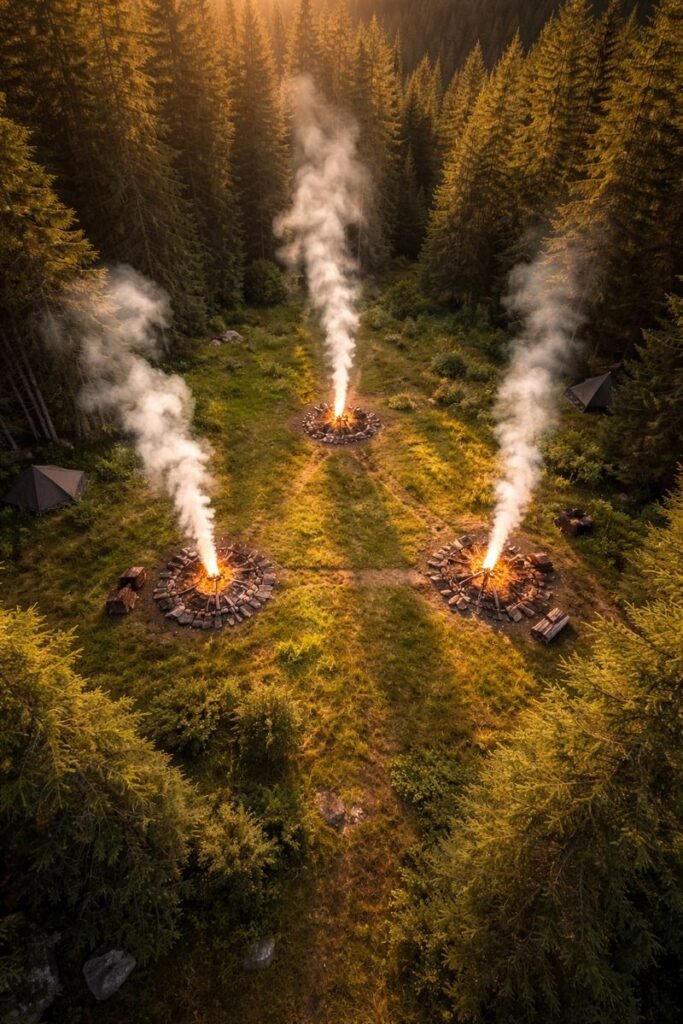
- Three signal fires arranged in a triangle
- Three loud noises of any kind
Why three? It’s distinctive. In nature, patterns of three don’t happen randomly. When search and rescue teams see or hear three evenly spaced signals, they immediately recognize it as a lost hiker rescue signal.
This universal SOS signal method is taught to pilots, park rangers, search and rescue volunteers, and outdoor professionals across the globe. Learn it, use it, and you’ll speak the same language as the people trying to find you.
Creating Signals with Maximum Visibility
Effective emergency signaling follows three principles: contrast, motion, and repetition.
Contrast means your signal stands out sharply against the natural background. Bright orange against green forest. Dark smoke against pale sky. Flashing light against darkness.
Motion catches the eye faster than stationary objects. Waving, flashing, or flickering signals attract attention instinctively.
Repetition ensures you’re not missed during brief scans. One flash might go unnoticed. Three flashes repeated every few minutes? That gets seen.
Best Visual Emergency Signaling Techniques
Visual signals are your primary tool during daylight hours. Here’s how to maximize them.
How to Build Signal Fires That Rescuers Can Spot
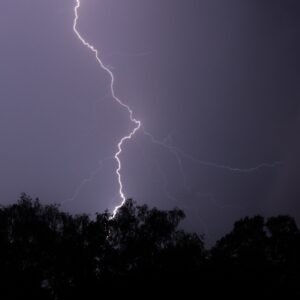
Fire remains one of the oldest and most powerful distress signals humans have ever used, and it’s still incredibly effective.
For maximum visibility:
Build your fire in an open clearing where aircraft can see it from above. Dense tree cover defeats the purpose.
Create thick smoke by adding green leaves, fresh grass, or damp vegetation once your fire is burning well. Smoke columns visible during the day can be spotted from miles away.
Keep the fire controlled and safe. The last thing you need is to start a wildfire that puts you and rescuers in even more danger.
If possible, maintain three separate fires in a triangle pattern about 30 feet apart. This unmistakably signals distress.
Ground-to-Air Symbols (SOS and Emergency Markers)
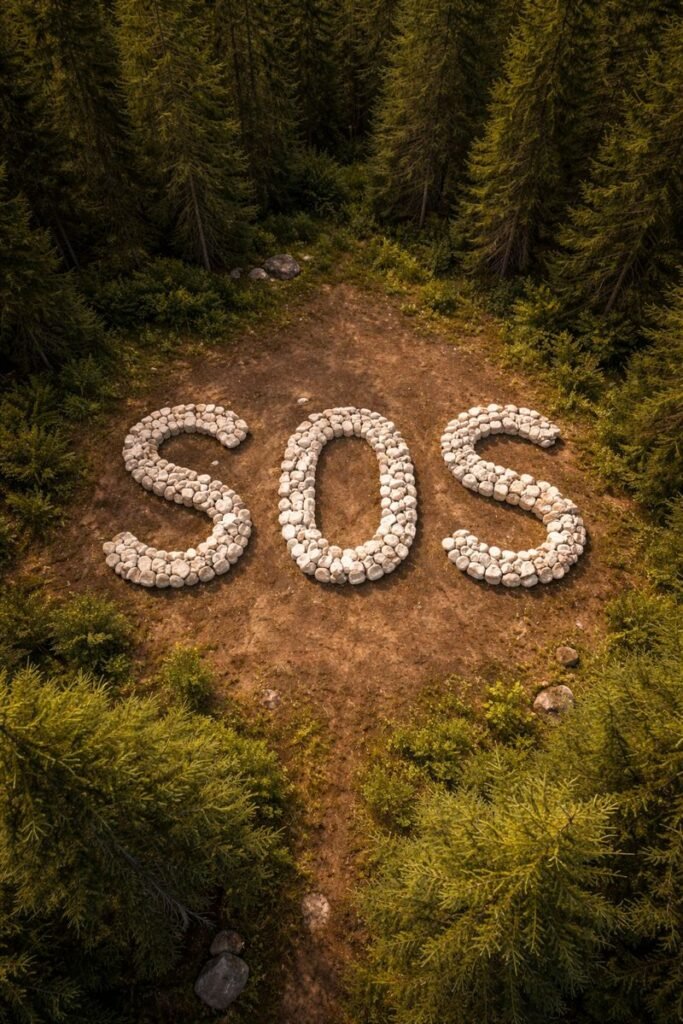
When you have time and you’re in open terrain, creating large ground markers can be incredibly effective for aerial searches.
The most recognized symbols:
→ – Traveling in this direction
SOS – Universal distress signal
X – Unable to proceed / need medical assistance
F – Need food and water
Make these symbols as large as possible—at least 10-12 feet long. Use whatever contrasting materials you have: rocks, logs, branches, bright clothing, or even cleared dirt/snow.
The bigger and more contrasting your marker, the easier it is to spot from a helicopter or plane.
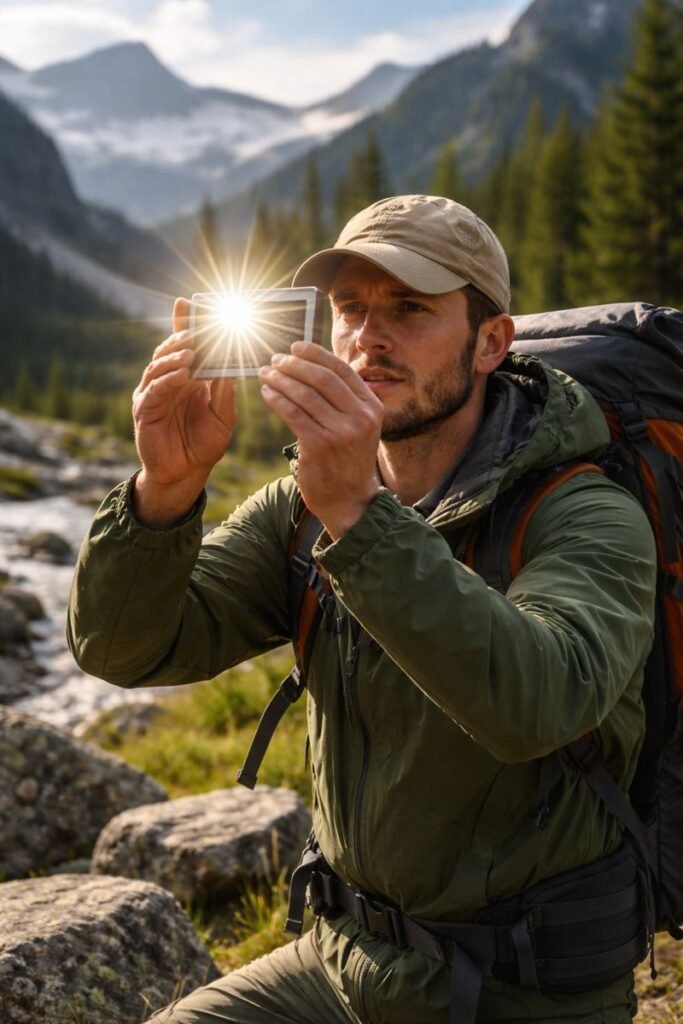
Signal Mirror Techniques for Daylight Rescue
A signal mirror is lightweight, requires no batteries, and can flash reflected sunlight for up to 10 miles on a clear day.
How to use it effectively:
Aim the reflection toward aircraft or distant high points where rescuers might be positioned. You can practice by reflecting onto your hand first, then sweeping that reflection toward your target.
Flash in groups of three (remember the Rule of Three), then pause and repeat.
Don’t have a signal mirror? Improvise with what you have:
- Smartphone screen
- Metal water bottle lid
- Belt buckle
- Any polished metal surface
- Even a CD or eyeglasses in a pinch
The key is catching and directing sunlight deliberately, not just randomly hoping someone notices a glint.
Using Bright Clothing and Camping Gear as Signals
Your existing gear can become powerful visual markers with just a bit of strategic thinking.

Bright jackets, rain covers, or hats should be:
- Laid flat in open clearings where they’re visible from above
- Hung from high branches to add height
- Positioned on ridgelines or hilltops
- Secured so they don’t blow away
Movement amplifies visibility. If you can attach lightweight fabric to a long stick and wave it, even better. Motion catches the eye faster than static color.
Spread tarps wide and anchor the corners with rocks. Bright backpacks can be elevated using branches or stacked rocks. Get creative with placement—think about sight lines from above and from ground level.
Audible Signaling Methods That Save Energy
Sound signals have one massive advantage: they travel through obstacles that block visual signals. Trees, terrain, and fog won’t stop sound the way they stop light.
Why a Survival Whistle Beats Shouting Every Time
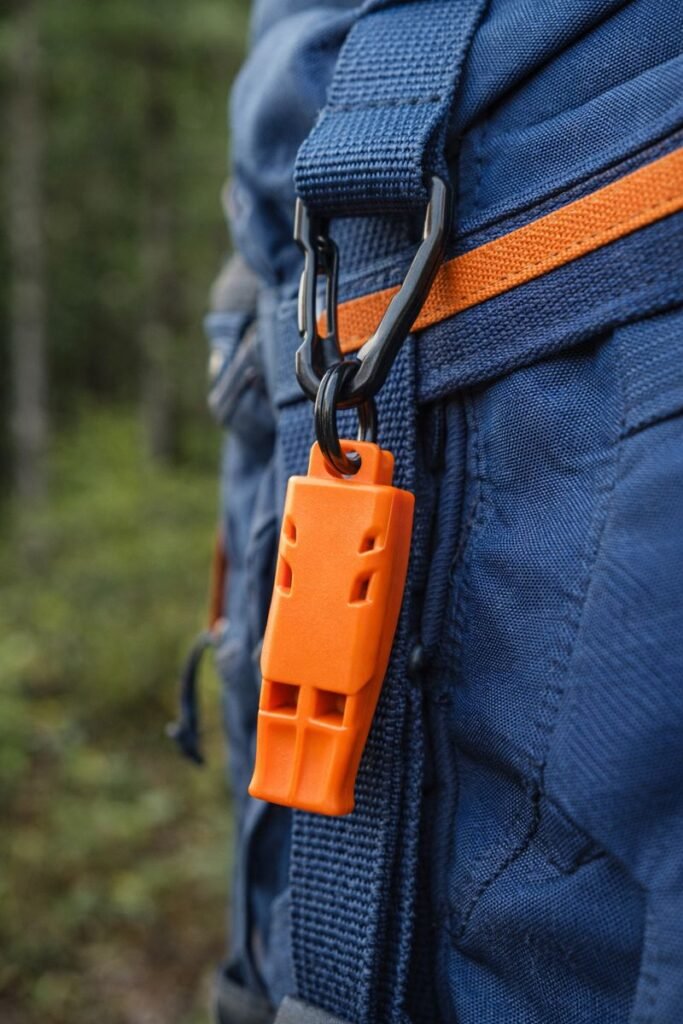
Shouting seems like the natural response when you’re lost. But here’s the problem: your voice gives out fast, and it doesn’t carry nearly as far as you think it does.
A whistle, on the other hand:
- Produces a sharp, penetrating sound that carries much farther
- Requires minimal energy
- Won’t strain or damage your throat
- Works consistently even when you’re exhausted
Proper whistle technique:
Three sharp blasts, then pause and listen. Repeat every 10-15 minutes to conserve energy while maintaining consistent signals.
Listen carefully during your pauses. Rescuers might whistle back to let you know they’re approaching.
Improvised Sound Signals from Natural Materials
No whistle? You can still create effective audible signals.
Try these improvised methods:
- Strike two rocks together with a sharp, rhythmic pattern
- Bang metal cookware or water bottles
- Snap thick, dry branches repeatedly
- Create a percussion rhythm using any available hard materials
The pattern matters more than the volume. Three evenly spaced sounds, repeated regularly, will eventually catch someone’s attention even if your individual sounds aren’t particularly loud.
Emergency Signaling at Night: Light-Based Techniques
Darkness brings new challenges, but it also makes light signals dramatically more visible.
Flashlight SOS Signals and Strobe Modes
If your flashlight or headlamp has an SOS mode or strobe function, now’s the time to use it. These features exist specifically for emergency signaling.
If you need to signal manually:
Three short flashes, pause, three short flashes, pause, repeat. Aim your light upward or sweep it across open terrain where it might be visible to distant rescuers.
Point it toward any sounds of aircraft or distant activity.
Battery conservation is critical at night. Signal periodically rather than continuously. Save enough charge to signal when you actually hear or see rescuers approaching.
Fire as a Nighttime Beacon
Even a modest campfire becomes a visible beacon after dark, potentially spotted from miles away.
Keep your fire steady rather than letting it flare dramatically and die down. A consistent light source is easier for rescuers to track than erratic flames.
If you have enough materials, maintain your three-fire triangle pattern—it’s even more distinctive at night.
Modern Technology for Wilderness Emergency Signaling
Technology enhances your options significantly, but it should complement manual signaling techniques, never replace them entirely.
Personal Locator Beacons (PLBs) Explained
Personal Locator Beacons are purpose-built emergency devices that transmit your exact GPS coordinates directly to rescue satellites monitored by emergency services.
Why they’re so effective:
- They work anywhere on Earth, even without cell service
- They’re waterproof and designed for extreme conditions
- They communicate directly with search and rescue coordination centers
- Battery life is measured in days, not hours
When you activate a PLB, professional rescuers receive your location and begin coordinating a response. This is the gold standard for wilderness emergency communication.
The downside? Cost. Quality PLBs run $250-400. But if you’re heading into remote backcountry regularly, they’re worth every penny.
Using your smart phone’s emergency SOS features
Modern smartphones include built-in emergency SOS features that can call for help and share your location—when you have service.
Key tips:
- Enable airplane mode to preserve battery, turning it off briefly every few hours to check for signal
- Most phones let you activate emergency SOS by pressing the power button multiple times
- Your phone can still be useful for light signaling even when service is unavailable
Don’t count on your phone as your primary rescue tool. Cell coverage is spotty in wilderness areas, batteries drain faster in cold weather, and devices can fail. But as a backup? Absolutely use it.
Satellite Messengers and GPS devices
Devices like Garmin inReach or SPOT messengers offer two-way satellite communication, allowing you to send specific messages and receive confirmation that help is on the way.
They’re an excellent middle ground between basic emergency beacons and full satellite phones, typically running $300-500 for the device plus subscription fees.
Environmental Strategies to amplify your signal
The landscape itself can work for you or against you. Smart positioning dramatically improves signal effectiveness.
Choosing the Best Location for Maximum Visibility
Always signal from positions with maximum exposure:
Ideal locations:
- Hilltops and ridgelines (visible from greater distances)
- Open meadows or clearings (aerial visibility)
- Riverbanks or lakeshores (often cleared and easier to spot)
- Rocky outcroppings that rise above tree cover
Locations to avoid:
- Dense forest with heavy canopy
- Deep valleys surrounded by hills
- Areas with thick brush that obscures you from multiple angles
If you must stay in less-than-ideal terrain for safety reasons, do everything possible to get your signals above the obstruction—elevated fires, high-hanging bright clothing, or moving to the edge of clearings.
Using Water and Terrain for Signal Reflection
Water surfaces reflect light exceptionally well, multiplying the effectiveness of mirror signals and fire light.
If you’re near a lake or river, position yourself where you can flash signals across the water surface. The reflection often doubles your visibility range.
Similarly, light-colored rock faces or sandy areas provide high-contrast backgrounds that make your signals pop visually.
Critical mistakes that prevent rescue
Even well-intentioned campers sometimes make errors that delay their rescue. Avoid these common problems:
Wandering instead of staying put – Creates a moving target that’s exponentially harder to find
Shouting until you’re hoarse – Wastes energy and damages your voice when you need it most
Relying on only one signaling method – Redundancy saves lives; use multiple techniques simultaneously
Placing all your signals under dense tree cover – Your best efforts become invisible from the air
Giving up on signaling – Rescue can take longer than expected; persistence is essential
Not conserving energy – You might need to signal for days, not hours
The campers who get found quickly use layered, strategic signaling combined with smart energy management.
Final Thoughts – Preparation is Survival
The best emergency signaling tips for lost campers start before you’re actually lost—pack an emergency whistle, choose bright orange gear, and share your hiking plans.
When things go wrong, knowing how to signal for help when lost makes the difference between a quick rescue and serious danger. Search and rescue teams need you to stay visible and audible through wilderness survival signaling.
Your mission is simple: use multiple camping emergency signals, stay put, and stay calm. These survival signaling techniques work—you just need to guide rescuers to you.
Frequently Asked Questions About Emergency Signaling
What is the most effective emergency signal for lost campers?
The most effective approach combines multiple methods simultaneously. Use visual signals like signal fires or bright clothing during the day, audible signals like whistle blasts throughout, and technology like PLBs if you have them. Layered signaling dramatically increases your chances of quick rescue.
Should I stay put or keep moving if I’m lost while camping?
If you’re genuinely lost—meaning you have no clear idea which direction leads to safety—staying put is almost always the safer choice. Movement exhausts you, expands the search area, and makes tracking harder. Stay in one location, conserve your energy, and focus your efforts on signaling.
What is the Rule of Three for wilderness distress signals?
The Rule of Three is the international emergency signal: three whistle blasts, three light flashes, or three fires arranged in a triangle pattern. This distinctive pattern immediately communicates distress to search and rescue professionals worldwide.
Do bright clothes actually help rescuers spot lost campers?
Absolutely. High-contrast colors like bright orange, red, and yellow stand out dramatically against natural greens and browns. Search and rescue teams specifically scan for these colors. Spread bright clothing in open areas and on elevated positions for maximum effect.
How often should I signal for help when lost in the wilderness?
Signal every 10-15 minutes to balance visibility with energy conservation. Constant signaling will exhaust you quickly, while signaling too infrequently risks being missed during brief search passes. Listen carefully between signals for responding rescuers.
What’s the best location to signal from when lost?
Signal from high, open positions like hilltops, meadows, clearings, or elevated ridgelines. These locations maximize visibility for both aerial and ground searchers. Avoid signaling from dense forests where tree canopy blocks sight lines.